
Charmander
Crochet Pattern

IMPORTANT
This pattern is property of @crochetbykittengrll. You may not alter, copy, sell, or redistribute this pattern or any part of it.
If you decide to post any photos of your creations made with this pattern, I would love for you to tag me (@crochetbykittengrll on TikTok/Instagram/Pinterest/YouTube) so I can see and share!
Notes
This pattern is in US terminology only.
I use the yarn under/yarn over method, but you may use whichever method you prefer. Keep in mind different crocheting methods may alter the way your plushie turns out.
All decreases in this pattern use the invisible decrease method because the regular decrease may leave larger gaps in your work. I highly recommend using the invisible decrease method.
If you’re having trouble closing your magic ring for ‘Round 1: mr sc 12,’ try the chain 2 method instead!
Materials
Yarn
Color A: Parfait Chunky (Super Bulky 6) in color ‘Tangerine’ - 2 skeins
Color B: Parfait Chunky (Super Bulky 6) in color ‘Mango’ - 1 skein
Color C: Parfait Chunky (Super Bulky 6) in color ‘Summer Squash’ - 1 skein (LIMITED EDITION)
Color D: Parfait Chunky (Super Bulky 6) in color ‘Mashed Potatoes’ - 1 skein (LIMITED EDITION)
Color E: Parfait Chunky (Super Bulky 6) in color ‘White’ - 1 skein
Worsted Weight in a similar color to Color A
Felt
Teal Felt
White Felt
Black Felt
(or you can purchase felt eye sewing kits HERE)
Embroidery Thread
Teal Embroidery Thread
White Embroidery Thread
Black Embroidery Thread
(or you can purchase felt eye sewing kits HERE)
Other
Embroidery Needle
Weaving/Yarn Needle
4mm Crochet Hook
Sewing Pins
Scissors
Stitch Markers
Fiberfil Stuffing
Abbreviations
ch = chain
mr = magic ring
sc = single crochet
inc = single crochet increase
hdc = half double crochet
hdc-inc = half double crochet increase
dec = invisible decrease
rnd = round
slst = slip stitch
st(s) = stitch(es)
FLO = front loop only
BLO = back loop only
FO = fasten off
CC = change color
Body
Use Color A and crochet in continuous rounds.
Round 1: mr sc 12 (12)
Round 2: (sc, inc) x6 (18)
Round 3: sc, inc, (sc 2, inc) x5, sc (24)
Round 4: (sc 3, inc) x6 (30)
Round 5: sc 2, inc, (sc 4, inc) x5, sc 2 (36)
Round 6: (sc 5, inc) x6 (42)
Round 7: sc 3, inc, (sc 6, inc) x5, sc 3 (48)
Round 8: (sc 7, inc) x6 (54)
Round 9: sc 4, inc, (sc 8, inc) x5, sc 4 (60)
Round 10-11: sc around (60) 2 ROUNDS
Round 12: (sc 4, inc) x6, sc 30 (66)
Round 13: sc around (66)
Round 14: sc 2, dec, (sc 4, dec) x5, sc 32 (60)
Round 15: sc around (60)
Round 16: (sc 3, dec) x6, sc 30 (54)
Round 17-19: sc around (54) 3 ROUNDS
Round 20: (sc 7, dec) x6 (48)
Round 21: sc around (48)
Round 22: sc 3, dec, (sc 6, dec) x5, sc 3 (42)
Start stuffing the body, and continue stuffing as you go.
Round 23: sc around (42)
Round 24: (sc 5, dec) x6 (36)
Round 25-30: sc around (36) 6 ROUNDS
Make a slst and FO, leaving a long tail to sew with later. Finish stuffing the body if necessary.
Head
Use Color A and crochet in continuous rounds.
Round 1: mr sc 12 (12)
Round 2: (sc, inc) x6 (18)
Round 3: sc, inc, (sc 2, inc) x5, sc (24)
Round 4: (sc 3, inc) x6 (30)
Round 5: sc 2, inc, (sc 4, inc) x5, sc 2 (36)
Round 6: (sc 5, inc) x6 (42)
Round 7: sc 3, inc, (sc 6, inc) x5, sc 3 (48)
Round 8: (sc 7, inc) x6 (54)
Round 9: sc 4, inc, (sc 8, inc) x5, sc 4 (60)
Round 10: (sc 9, inc) x6 (66)
Round 11-20: sc around (66) 10 ROUNDS
Round 21: sc, inc, (sc 2, inc) x21, sc (88)
Round 22-23: sc around (88) 2 ROUNDS
Round 24: sc 3, dec, (sc 6, dec) x10, sc 3 (77)
Round 25: (sc 5, dec) x11 (66)
Round 26: sc 2, dec, (sc 4, dec) x10, sc 2 (55)
Round 27: (sc 3, dec) x11 (44)
Round 28: sc, dec, (sc 2, dec) x10, sc (33)
Start stuffing the head and continue stuffing as you see fit.
Round 29: (sc, dec) x11 (22)
Round 30: dec 11 (11)
Make an additional 5 dec sts. Then, FO and sew the hole closed, weaving in your excess yarn tail.
Arms
Use Color A and crochet in continuous rounds. Make two.
Round 1: mr sc 12 (12)
Round 2: (sc, inc) x6 (18)
Round 3-10: sc around (18) 8 ROUNDS
Round 11: sc 2, dec, (sc 4, dec) x2, sc 2 (15)
Round 12: sc around (15)
Slightly stuff the arm.
Round 13: (sc 3, dec) x3 (12)
Round 14: sc around (12)
Stuff the arm some more [slightly if necessary] - do not overstuff. Pinch the final 12 sc’s flat, and make 6 sc’s through both sides of rnd 14. FO and leave a long tail to sew with later.
Fingers
To crochet the fingers, follow the steps below with Color A:

Thighs
Use Color A and crochet in continuous rounds. Make two.
Round 1: mr sc 6 (6)
Round 2: inc 6 (12)
Round 3: (sc, inc) x6 (18)
Round 4: sc, inc, (sc 2, inc) x5, sc (24)
Round 5: (sc 3, inc) x6 (30)
Round 6: sc 2, inc, (sc 4, inc) x5, sc 2 (36)
Round 7-8: sc around (36) 2 ROUNDS
Make a slst and FO, leaving a long tail to sew with later.
Feet
Start with Color D and crochet in continuous rounds. Make two.
Round 1: mr sc 12 (12)
Round 2: (sc, inc) x6 (18)
CC to Color A.
* Tip: To make a clean color change, FO with Color D and make a faux sc st. Then, insert your hook into the BLO of any st with Color A and begin rnd 3. For a visual, see the step-by-step photos below:

Round 3: BLO: [sc, inc, hdc 2, hdc-inc, (sc 2, inc) x2, hdc 2, hdc-inc, sc 2, inc, sc] (24)
Round 4: sc 3, hdc-inc, hdc 3, (inc, sc 3) x2, hdc-inc, hdc 3, inc, sc 3, inc (30)
Round 5-6: sc around (30) 2 ROUNDS
Round 7: (sc 3, dec) x6 (24)
Round 8: sc, dec, (sc 2, dec) x5, sc (18)
Start stuffing and keep stuffing as you go.
Round 9: (sc, dec) x6 (12)
Round 10: dec 6 (6)
FO and sew the hole closed, weaving in your excess yarn tail.
Toenails
To crochet the toenails, follow the steps
below using Color E for both feet:

Tail
Start with Color B and crochet in continuous rounds.
Round 1: mr sc 4 (4)
Round 2: (sc, inc) x2 (6)
Round 3: sc around (6)
Round 4: (sc, inc) x3 (9)
* In rnds 5-6, we will be color changing a lot. To make the pattern easier to read, the RED UNDERLINED TEXT will indicate which stitches should be made in Color B, and the YELLOW BOLD TEXT will indicate which stitches should be made in Color C. If an increase st consists of different colors, you will see the specification of this within the following parentheses. For example, inc(sc,sc) means that the first st of the inc should be made in Color B, and the following one should be made in Color C.
Round 5: sc, inc(sc, sc), sc, inc, sc, inc, sc, inc(sc, sc), sc (13)
Round 6: sc, sc 2, sc 2, sc 2, sc, sc 2, sc, sc 2 (13)
Continue using ONLY Color C for rnds 7-12.
Round 7: sc, inc, (sc 2, inc) x3, sc, inc (18)
Round 8: (sc 2, inc) x6 (24)
Round 9: sc around (24)
Round 10: (sc, dec) x8 (16)
Start stuffing the flame, and continue stuffing the flame as you go.
Round 11: dec 8 (8)
Round 12: dec 4 (4)
CC to Color A.
Round 13: (sc, inc) x2 (6)
Round 14: sc around (6)
Round 15: (sc, inc) x3 (9)
Round 16: sc around (9)
Round 17: sc, inc, (sc 2, inc) x2, sc (12)
Round 18: sc around (12)
Round 19: (sc 3, inc) x3 (15)
Round 20: sc 2, inc, (sc 4, inc) x2, sc2 (18)
Round 21: (sc, dec) x3, (sc 2, inc) x3 (18)
Round 22: sc, inc, (sc 2, inc) x5, sc (24)
Round 23: (sc 2, dec) x2, sc 2, (sc 3, inc) x3, dec (24)
Round 24: sc around (24)
Round 25: (sc 3, inc) x6 (30)
Round 26: (sc 3, dec) x2, sc 3, inc, (sc 4, inc) x2, sc 4, dec (30)
Round 27: sc around (30)
Round 28: sc 2, inc, (sc 4, inc) x5, sc 2 (36)
Round 29: (sc 4, dec) x2, sc, (sc 5, inc) x3, sc 3, dec (36)
Round 30: sc around (36)
Round 31: (sc 5, inc) x6 (42)
Round 32: (sc 5, dec) x2, sc 4, inc, (sc 6, inc) x2, sc 7, dec (42)
Make a slst and FO, leaving a long tail to sew with later. Stuff the tail.
Belly
Use Color D and crochet in rows. *To make the edges look cleaner, I do not utilize turning ch’s.
Row 1: mr sc 2, turn (2)
Row 2: sc across, turn (2)
Row 3: inc 2, turn (4)
Row 4-5: sc across, turn (4) 2 ROWS
Row 6: sc, inc 2, sc, turn (6)
Row 7-8: sc across, turn (6) 2 ROWS
Row 9: sc, inc, sc 2, inc, sc, turn (8)
Row 10-11: sc across, turn (8) 2 ROWS
Row 12: sc, inc, sc 4, inc, sc, turn (10)
Row 13-16: sc across, turn (10) 4 ROWS
Row 17: sc, inc, sc 6, inc, sc, turn (12)
Row 18-21: sc across, turn (12) 4 ROWS
Row 22: sc, inc, sc 8, inc, sc, turn (14)
Row 23-52: sc across, turn (14) 30 ROWS
Row 53: skip 1 st, sc 13, turn (13)
Row 54: skip 1 st, sc 12, turn (12)
Row 55: skip 1 st, sc 11, turn (11)
Row 56: skip 1 st, sc 10, turn (10)
Row 57: skip 1 st, sc 9, turn (9)
Row 58: skip 1 st, sc 8, turn (8)
Row 59: skip 1 st, sc 7, turn (7)
Row 60: skip 1 st, sc 6 (6)
Slst around the entire belly piece until you make your way back to the last sc you made in row 60. Don’t make these sts super tight or your belly will curl a little too much. FO, leaving a long tail to sew with later.
Assembly
1. Shape the face using the step-by-step instructions below:

2. Cut out and embroider your felt eyes with white, black, and teal felt (or you can skip this part if you purchase pre-cut felt eye kits HERE). Using matching embroidery thread with an embroidery needle, sew the eyes together and then onto the face!

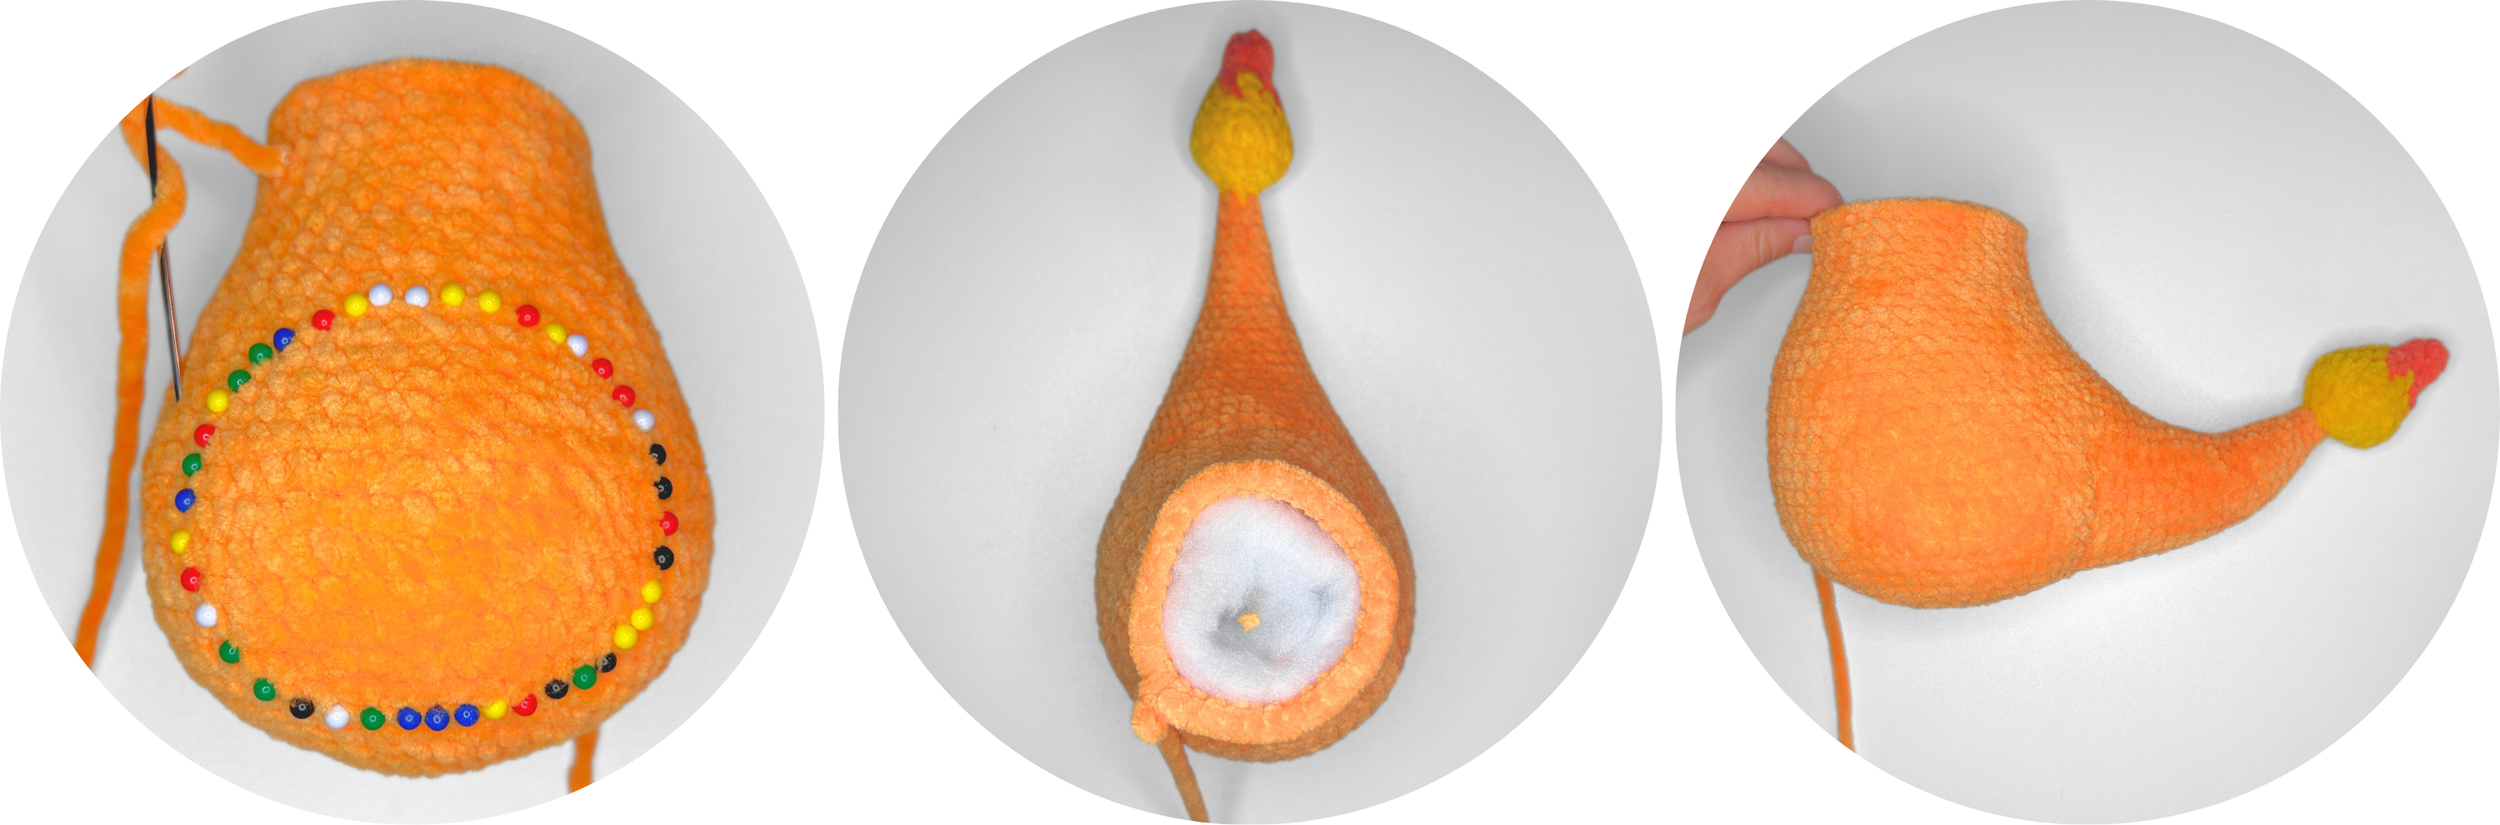
3. Sew the tail onto the back of the body (the side that protrudes outwards a bit) from rnds 8-20, using the leftover yarn strand from the tail. I like to use 36 sewing pins to map out the 36 sts of the tail, which can be seen in the first photo below. You will want to add additional stuffing the tail before completely sewing it on.
4. Sew the belly onto the body/tail using the leftover yarn tail from the belly. Do not sew using the slst’s - you’ll want these left out for a cleaner looking edge. Sew using the sts on the backside of the belly.
The belly should go all way from the bottom of the flame, up to
~ rnd 28-29 in the front of the body.
*Tip: You may find it useful to use a worsted weight yarn to sew the belly on. The yarn will not be visible and since this requires a lot of sewing, it can be easier this way!

5. Sew the head onto the body using the leftover yarn tail from the body. Ensure the face is centered with the belly while doing this, and make sure you tuck in/hide the yarn tails from when we shaped the face! Add additional stuffing to the neck area before completely sewing these pieces together.

6. Sew the thighs onto the body using the leftover yarn tails from the thighs. I like to use 72 sewing pins (36 for each thigh) to map out the 36 sts of each thigh. The visual of the sewing pins gives me a good idea as to whether or not the thighs are centered before committing to sewing them down. Remember to stuff the thighs before completely sewing them on.

7. Sew the feet onto the thighs/body using worsted weight in Color A.

8. Sew the arms onto the body using the leftover yarn tails from the arms. Sew them at a slight angle from rnds 25-29.

* CONGRATS *
You're Finished!
* CONGRATS * You're Finished!
I hope you enjoyed crocheting Charmander with me! If you have any questions, feel free to email me at crochetbykittengrll@yahoo.com. I am more than happy to help!
I would love to see your finished creations! Feel free to tag me in your posts so I can see (@crochetbykittengrll on TikTok/Insta/YouTube/Pinterest)! Or follow me to keep up with any future patterns!
The best way to support me, and allow me to release more free patterns is to follow me on my socials and if you recreate this design, to tag me!


