
SNORLAX PATTERN


DIFFICULTY LEVEL: INTERMEDIATE/NOT SUITABLE FOR BEGINNERS
ch = chain
mr = magic ring
sc = single crochet
inc = single crochet increase (unless specified otherwise)
sc-inc = single crochet increase (I use this in the feet section instead of ‘inc’ to avoid confusion
dec = single crochet decrease (I recommend using the invisible decrease method)
Abbreviations
dc = double crochet
dc-inc = double crochet increase
hdc = half double crochet
hdc-inc = half double crochet increase
slst = slip stitch
rnd = round
Yarn: Super Bulky (6) unless specified otherwise.
- Bernat Blanket yarn the color ‘Dark Teal’ for the body (3 [300g] skeins)
- Bernat Blanket yarn in the color ‘Vintage White’ for the belly and face plate (1 [300g] skein)
- Bernat Blanket yarn in the color ‘Almond’ for the feet (1 [300g] skein)
- OPTIONAL: Bernat Baby Blanket yarn in the color ‘White’ for the nails - you may also use the same color as the belly/face plate (Vintage White) but I prefer to use a brighter white for the nails (1 [300g] skein)
- Any medium 4 black yarn for the eyes and mouth
OPTIONAL for the 2 teeth:
- White felt
- White embroidery thread
- Embroidery Needle
Materials/Notions
Polyester Stuffing
6mm Crochet Hook
Stitch markers
Sewing pins
Yarn Needle
Scissors
Notes
This pattern uses US terminology only.
I use the yarn under/yarn over method, but you may use whichever method you prefer.
All decreases in this pattern use the invisible decrease method - the regular decrease method will leave larger gaps in your work. I highly recommend using the invisible decrease method.
The body parts are crocheted in a continuous spiral, and the belly and face plates are crocheted in rows. This will also be specified in their relative sections before you begin crocheting the pieces.
When you crochet the body, you will find that ruffles or curls form. This is normal due to the large amount of increases in the belly and it’s okay because it’s what’s going to make him nice and chunky in the end! Just make sure when it’s time to stuff that you stuff him enough so that his body takes on a round shape!
IMPORTANT
This pattern is property of @crochetbykittengrll. You may not alter, copy, sell, or redistribute this pattern or any part of it.
If you decide to post any photos of your creations made with this pattern, I would love for you to tag me (@crochetbykittengrll on TikTok/Instagram/Pinterest/YouTube) so I can see and share!
Body
Use Dark Teal Yarn
CH 15 and work in a continuous spiral around both sides of the chain.
Round 1: Starting in the second chain from hook - sc 3 inc (make 3 sc’s in the same stitch), sc 12, inc
Now flip your work and continue onto the other side of the ch; your first sc will be in the same stitch you just worked in, just on the opposite side- sc 3 inc (make 3 sc’s in the same stitch), sc 12, inc (34)
TIP: For this pattern, I crochet into the front and back loop of each chain, so on the first side, I will be crocheting into all 14 front loops. When I flip to the other side, I am crocheting into ALL 14 back loops of the chain. (ignoring the 15th chain) Below are photo examples of this.

Starting from the right, with your hook in the 15th chain -
3 sc inc, sc 12, inc
Turn your work and continue.

Now crochet into the other side of the chain -
3 sc inc, sc 12, inc
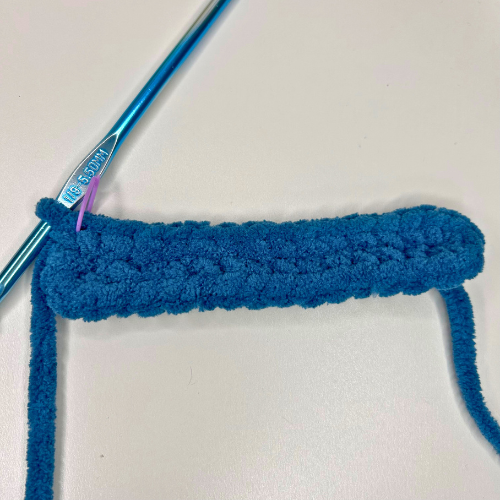
You should now have 34 sc.
Continue crocheting in a spiral for round 2.
Round 2: inc x2, 14 sc, inc x3, 14 sc, inc (40)
Round 3: (sc, inc) x2, sc 14, (sc, inc) x3, sc 15, inc (46)
Round 4: (sc 2, inc) x2, sc 14, (sc 2, inc) x3, sc 16, inc (52)
Round 5: (sc 3, inc) x2, (sc, inc) x7, (sc 3, inc) x3, (sc, inc) x7, sc 3, inc (72)
Round 6: sc 2, inc, sc 4, inc, sc 25, inc, (sc 4, inc) x2, sc 25, inc, sc 2 (78)
Round 7: (sc 5, inc) x13 (91)
Round 8: sc around (91)
Round 9: sc 6, inc, (sc 12, inc) x6, sc 6 (98)
Round 10: sc 10, (sc 5, inc) x 7, sc 46 (105)
Round 11: sc around (105)
Round 12: sc 7, inc, (sc 14, inc) x6, sc 7 (112)
Round 13-15: sc around (112) [3 ROUNDS]
Round 16: sc 7, dec, (sc 14, dec) x6, sc 7 (105)
Round 17-27: sc around (105) [11 ROUNDS]
Round 28: (sc 13, dec) X 7 (98)
Round 29-30: sc around (98) [2 ROUNDS]
Round 31: sc 6, dec, (sc 12, dec) X6, sc 6 (91)
Round 32-33: sc around (91) [2 ROUNDS]
Round 34: (sc 11, dec) X7 (84)
Round 35: sc around (84)
Round 36: sc 5, dec, (sc 10, dec) x6, sc 5 (77)
Round 37: (sc 9, dec) X7 (70)
Round 38: (sc 5, dec) X10 (60)
Round 39: sc 2, dec, (sc 4, dec) X9 , sc 2 (50)
Make a slst, and leave a long tail for sewing. Wait until assembly to stuff, and set aside to begin crocheting the head.
Head
Use Dark Teal Yarn
CH 13 and work in a continuous spiral around both sides of the chain.
Round 1: Starting in the second ch from hook - inc, sc 11
Now flip your work and continue onto the other side of the ch; your first sc will be in the same stitch you just worked in, just on the opposite side- inc, sc 11 (26)
Round 2: inc x2, sc 10, inc x3, sc 10, inc (32)
Round 3: (sc, inc) x2, sc 10, (sc, inc) x3, sc 11, inc (38)
Round 4: sc, inc, sc 2, inc, sc 12, inc, (sc 2, inc) x2, sc 12, inc, sc (44)
Round 5: sc 10, inc, sc 6, inc, sc 14, inc, sc 6, inc, sc 4 (48)
Round 6: (sc 7, inc) x6 (54)
Round 7: sc 4, inc, (sc 8, inc) x5, sc 4 (60)
Round 8: sc around (60)
Round 9: (sc 9, inc) x6 (66)
Round 10: sc around (66)
Round 11: sc 5, inc, (sc 10, inc) x5, sc 5 (72)
Round 12-15: sc around (72) [4 rounds]
Round 16: sc 5, dec, (sc 10, dec) x5, sc 5 (66)
Round 17: sc around (66)
Round 18: (sc 9, dec) x6 (60)
Round 19: sc around (60)
Round 20: (sc 4, dec) x10 (50)
Make a slst and leave a tail, but there’s no need for it to be long because we left a long tail on the body to sew the head and body together. Wait until assembly to stuff, and set aside. Move onto the arms.
Arms
Make 2 - Use Dark Teal Yarn
Round 1: mr 8 (8)
Round 2: (inc 2, sc 2) x2 (12)
Round 3: (sc, inc) x2, sc 3, inc, (sc, inc) x2 (17)
Round 4: (inc, sc) x3, inc, sc 4, (inc, sc) x3 (24)
Round 5-16: sc around (24) [12 ROUNDS]
Round 17: (sc 2, dec) x6 (18)
Round 18-19: sc around (18) [2 ROUNDS]
Stuff the bottom of the arm normally, and the top of the arm slightly.
Pinch the opening of your arm closed and then sc 9 across both sides, crocheting it shut. Set to the side, and move onto the feet.
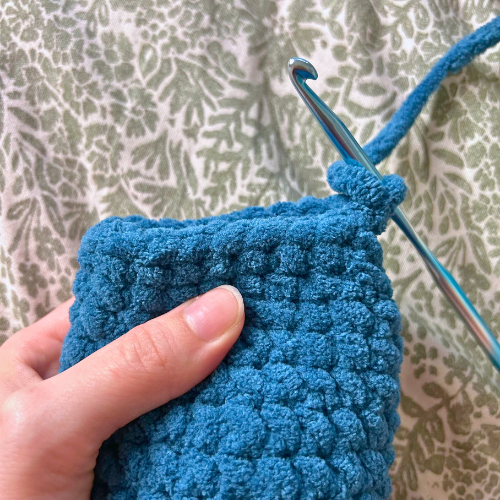
1. After stuffing, pinch the sides of the arms shut.

2. Crochet through both sides. To do this, insert your hook into the next stitch as well as the last stitch you made. SC as normal.

3. You should be left with 9 sc’s.
Feet
Make 2 - Start With Almond Yarn
Round 1: mr 10 (10)
Round 2: inc x10 (20)
Round 3: sc, hdc-inc, (dc, dc-inc) x2, hdc, (sc-inc, sc) x6 sc-inc (30)
Change color from almond to vintage white.
Round 4: sc 2, inc, (sc 4, inc) x 5, sc 2 (36)
Round 5: (sc 5, inc) x6 (42)
Round 6: (sc 3, inc) x4, sc 26 (46)
Round 7: hdc x3, dc x12, hdc x3, sc 28 (46)
Round 8: sc around (46)
Round 9: sc 25, dec, sc 6, dec, sc 11 (44)
Round 10: (sc 2, dec) x5, (sc 4, dec) x4 (35)
Round 11: (sc 3, dec) x7 (28)
Round 12: sc, dec, (sc 2, dec) x6, sc (21)
Round 13: (sc, dec) x7 (14)
Stuff the foot.
Round 14: dec x7 (7)
Close shut, and fasten off. Leave a long tail for sewing. Set to the side and continue onto the ears.
Ears
Make 2 - Use Dark Teal Yarn
Round 1: mr 4 (4)
Round 2: inc x4 (8)
Round 3: (sc, inc) x4 (12)
Round 4: sc around (12)
Round 5: sc, inc, (sc 2, inc) x3, sc (16)
Round 6: sc around (16)
Round 7: (sc 3, inc) x4 (20)
Round 8: sc 2, inc, (sc 4, inc) x3, sc 2 (24)
Make a slst, leave a long tail for sewing, and set ears to the side. Continue onto the belly.
Belly
Use Vintage White Yarn
CH 13 and work in rows. I do NOT ch 1 at the end of my rows. You may do so if you’d like, I just find it makes cleaner edges!
Row 1: inc, sc 4, inc, sc 5, inc, turn (15)
Row 2: inc, sc 2, inc, sc 7, inc, sc 2, inc, turn (19)
Row 3: inc, sc 17, inc, turn (21)
Row 4: inc, sc 5, inc, sc 8, inc, sc 5, turn (24)
Row 5: inc, sc 22, inc, turn (26)
Row 6: sc across, turn (26)
Row 7: inc, sc 24, inc, turn (28)
Row 8-19: sc across, turn (28) [12 ROWS]
Row 20: dec, sc 24, dec, turn (26)
Row 21: sc across, turn (26)
Row 22: dec, sc 22, dec, turn (24)
Row 23: sc across (24)
Row 24: dec, sc 20, dec, turn (22)
Row 25: (dec, sc 8) x2, dec, turn (19)
Row 26: dec, sc 6, dec, sc 7, dec, turn (16)
Row 27: dec, sc 3, dec, sc 2, dec, sc 3, dec (12)
Sc around the entire edge of the belly, make a slst, and then leave a long tail for sewing. Continue onto the face.
Face
Use Vintage White Yarn
CH 16 and work in rows. I do NOT ch 1 at the end of my rows. You may do so if you’d like, I just find it makes cleaner edges!
Row 1: sc 15, turn (15)
Row 2: inc, sc 13, inc, turn (17)
Row 3: inc, sc 15, inc, turn (19)
Row 4: inc, sc 17, inc, turn (21)
Row 5-8: sc across, turn (21) [4 ROWS]
Row 9: dec, sc 8, slst, sc 8, dec, turn (19)
Row 10(L): dec, sc 7, turn (8)
Row 11(L): dec, sc 6, turn (7)
Row 12(L): dec, sc 3, dec, turn (5)
Row 13(L): dec, sc, dec, turn (3)
Row 14(L): sc, dec (2)
FASTEN OFF, THIS END WILL NOT BE USED FOR SEWING.
Make a slip knot around your hook and insert your hook into st 11 of row 9. This is where we will start the right side of row 10.
The peaks of the face are crocheted separately from rows 10-14. Because of this, I split the rows up. After the row #, there’s either a (R) for right, or a (L) for left.

The left side of the face is complete - now insert your hook into st 11 of row 9 as shown above. This is where you’ll start the next peak!
Row 10(R): sc 7, dec, turn (8)
Row 11(R): sc 6, dec, turn (7)
Row 12(R): dec, sc 3, dec, turn (5)
Row 13(R): dec, sc, dec, turn (3)
Row 14(R): sc, dec (2)

This is how the face should look after Row 14(R). Now sc around the entire edge of the face and it’s done!
Sc around the entire edge of the face. When you make it to the slst you made on round 9, make another slst into it instead of a sc. Crochet over any loose ends as you go, and when you make it to the end, slst into the first sc you made. Fasten off, and leave a long tail for sewing. Move onto the assembly.
Assembly
Now that we’ve got all the pieces crocheted, we’re going to assemble them! I’m going to walk you through exactly how I sew everything together to ensure things get sewn on evenly. Some of it may seem tedious, but after making Snorlax multiple times this is how I ensure he gets sewn up accurately! Of course, you can feel free to sew everything together in any way you please! This is just how I do it if you’d like to follow along. Feel free to skip to parts two and/or three, where I add the nails and face, if you’d prefer to sew things on your way.
PART ONE: SEWING EVERYTHING TOGETHER
Step 1:
Mark the center of the face and belly.

I like to map out the middle 14 stitches of the bottom of the face and the top of the belly because we’ll be sewing them together. I place stitch markers to mark the center 14 stitches I want to sew together! This helps me make sure the pieces are sewn on evenly and will look centered.
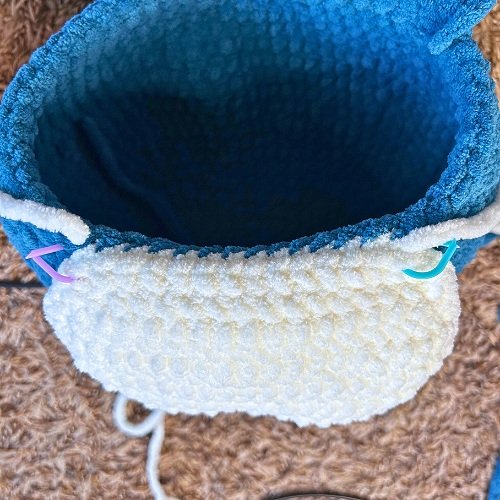
Step 2:
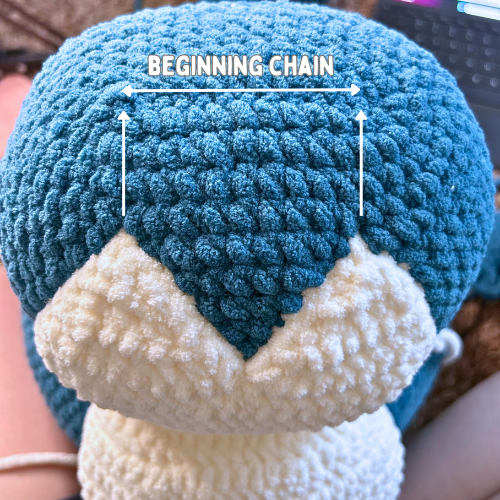
Center the face onto the head.

Lay your head flat so that the beginning chain of the head is straight/horizontal. Line up the face to be parallel with the beginning chain. The arrows in the image above show how my pieces are lined up to be parallel. You may want to use stitch markers to also mark the center stitches of the head.
Step 3:
Begin sewing the face onto the head.

Using Vintage White yarn, sew the BACK LOOPS of the FACE and the FRONT LOOPS of the HEAD together along the 14 stitches we mapped out in step 1. I start by only sewing these 14 stitches, and I don’t sew the rest of the face on until step 9.
What your head should now look like after step 3:

This is what you’ll be left with after step 3. The back loop of the face and front loop of the head should be sewn on parallel to the beginning chain of the head. Don’t continue sewing the face at this point.
Step 4:
Mark the center of the body.

Flatten your body the best you can; it will naturally want to curve since it’s round. Now mark the center 14 stitches of the body. Again, we want them to be parallel with the beginning chain of the body!
Step 5:
Begin sewing the belly onto the body.
Using Vintage White Yarn, sew the BACK LOOPS of the BELLY and the FRONT LOOPS of the BODY together along the 14 stitches we mapped out in step 1 and step 4. The photo above shows how it should look when that’s all done.
Step 6:
Sew the belly and face together.

Using Vintage White Yarn, sew together the FRONT LOOPS of the BELLY to the FRONT LOOPS of the FACE. I like doing it this way to ensure the white pieces line up perfectly before I sew the head and body together!
Step 7:
Start sewing the head onto the body.
STUFF THE BODY COMPLETELY. Using Dark Teal Yarn, sew together the BACK LOOPS of the BODY to the BACK LOOPS of the HEAD, along the center 14 stitches.
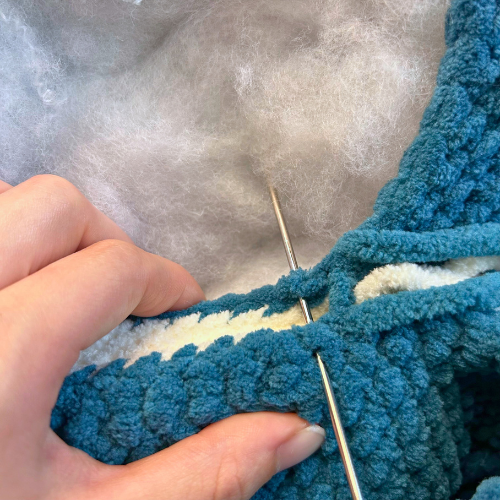
Step 8:
Continue sewing the head and body.

Using Dark Teal Yarn, continue sewing the head and body together. When you get about 3/4 of the way done, start stuffing the head and continue to stuff more as you sew.
Step 9:
Sew the face peaks down.
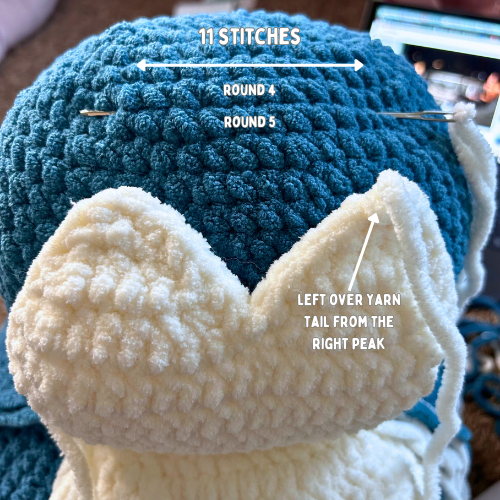
Using the Vintage White yarn tail on the right side of the face, sew down the two peaks of the face. I try to line them up evenly with the beginning chain of the head, which you can see in step 10’s photo. They’re sewn between rounds 4-5 about 11 stitches apart.
Step 10:
Sew the rest of the face down.
I find having the peaks already sewn down before sewing on the whole piece makes it a lot easier to sew it on evenly. Using the same Vintage White yarn tail, sew down the rest of the face. For a cleaner look, ONLY sew down the BACK LOOPS of the face!
For reference, this is what my face looks like sewn down:
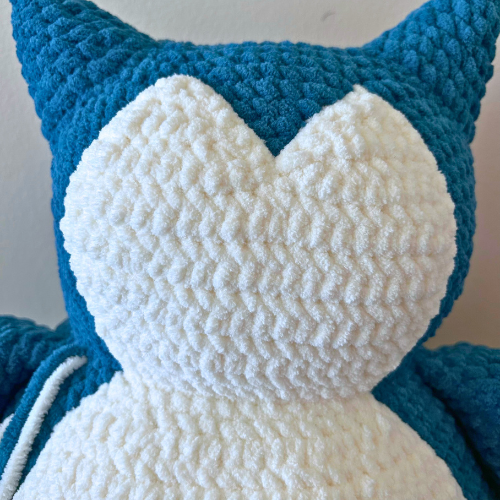
If you sewed down the peaks first like I did, you may have to sew the face down in sections. I started by sewing the center between the peaks first and then went onto sewing along the sides.
Step 11:
Sew down the belly.

Using Vintage White, sew down the belly. You will want to stretch it out as much as possible so that it lays flat and snug. For reference, the bottom of my belly is sewn between rounds 13-14. For a cleaner look, ONLY sew down the BACK LOOPS of the belly!
For reference, this is what my belly looks like sewn down:

Try to make your belly as evenly round as possible! I think sewing down only the back loops helps a lot!
Step 12:
Sew on the ears.
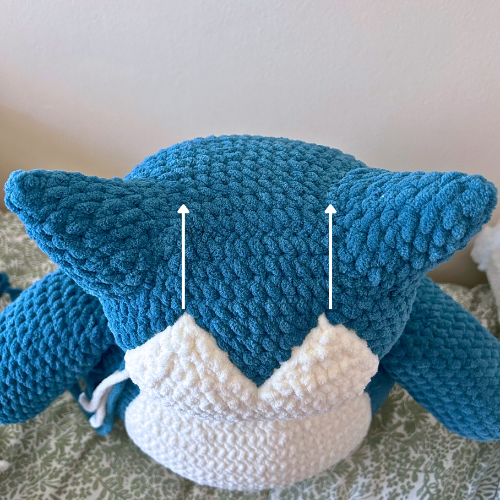
Using your Dark Teal yarn tails from the ears, sew down the ears. Try to line them up with the peaks of the face, as shown in the photo above. Stuff the ears before they’re completely sewn down. Refer to the next step for further details.
Step 13:
Continue sewing on the ears.

I sew the ears down about 7 rounds, between rounds 8-9. Do this for both ears, and we’ll move onto the arms!
Step 14:
Sew on the arms.

Using your Dark Teal yarn tails from the arms, sew down the arms. Sew them on starting where the head and body meet, about 4 stitches away from the white belly piece. Refer to the next step for further details.
Step 15:
Continue sewing on the arms.
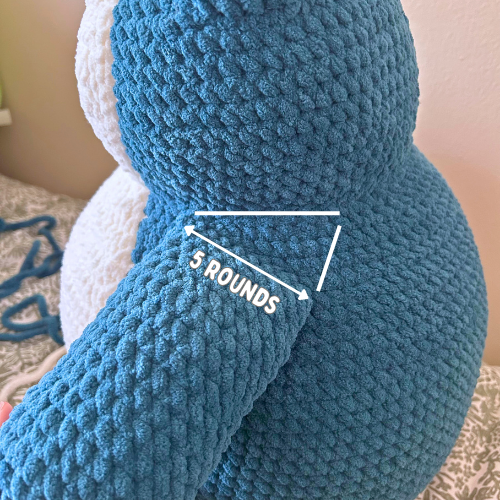
I sew the arms down about 5 rounds at an angle. You can refer to the photo above to try to replicate the same angle! Do this for both arms and move onto the feet!
Important Note: Feet Orientation

To know which side of the foot is the top and which side is the bottom, reference the dc’s and hdc’s in the almond color. They appear as the longer stitches. The arrow in the picture above points these out! That’s the top of your foot!
Important Note: Feet Direction

Image Source: https://bulbapedia.bulbagarden.net/wiki/Snorlax_(Pok%C3%A9mon) I like to reference this picture when sewing on the feet. You can see his feet aren’t straight up, they’re at a slight angle!
Step 16:
Find the right placement for the feet.

Sit your Snorlax flat on the ground because this will help you find the right spot to sew down the feet. If you eyeball this and sew them too high up, it will look goofy!
Step 17:
Sew on the feet.

Now that you know where you want to sew down the feet, find where your Vintage White yarn tail from your foot falls on the body and begin sewing the foot on. I go around the entire foot in a circular direction about 3-4 times so it’s extra secure. Repeat this process for the other foot!
PART TWO: CROCHET ON THE NAILS
Snorlax has 3 nails on his toes and 5 nails on his hands! To add these details, I crochet onto the surface of the feet and hands. We’re going to start with the feet; follow the steps below for detailed instructions!
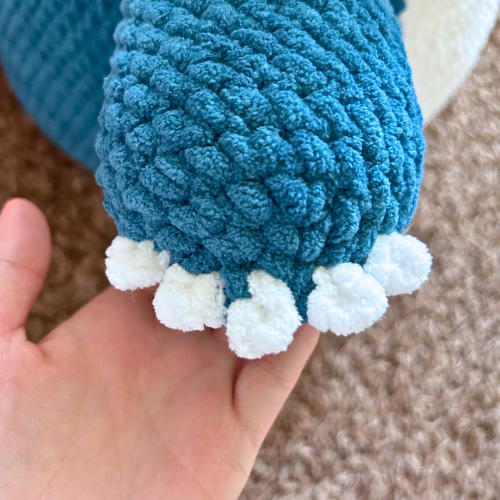
Step 1:
Make a slip knot and slst into rd 7.
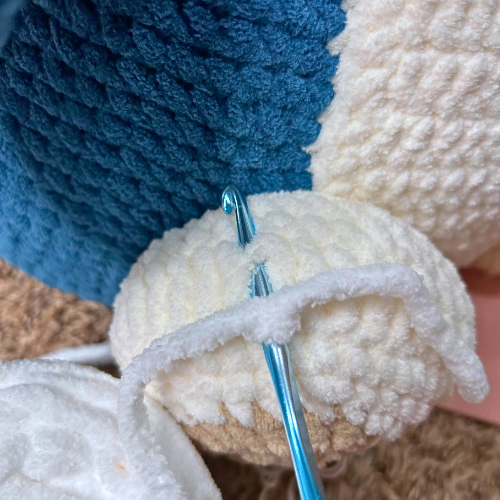
I like to start with the center nail - I find that’s the easiest way to center them. Using White Yarn, make a slip knot around your hook (leaving a long enough yarn tail for sewing) and insert your hook into round 7. This is the round with the dc’s and hdc’s. Make a slst.
Step 2:
Chain 5.
Now chain 5.
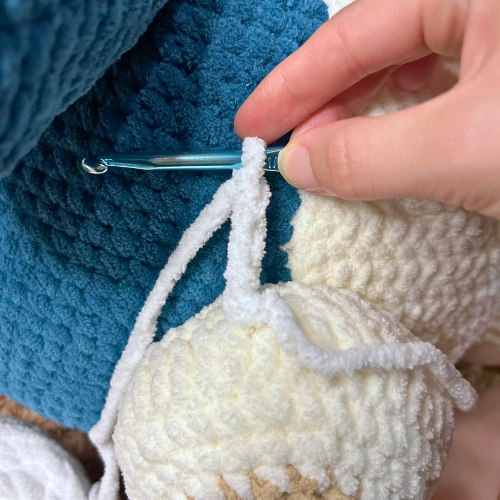
Step 3:
Make a slst back into rd 7.

Make a slst into round 7 again - the same place you originally made your slst. This will give you a little loop for the toenail! Cut your yarn leaving a yarn tail for sewing.
Step 4:
Make the other two nails!

Make your other two toenails about 4 stitches away from your center one!
Step 5:
Weave in the ends.

At this point, weave in your ends and repeat this process for the other foot.
Step 6:
Make the fingernails.

Snorlax has 5 fingernails. We are going to do the same thing we just did for the toenails, but they’re going to be smaller. In the photo above, I’ve marked where I place my fingernails with red dots!
Step 7:
Repeat the toenail process, but ch 3.
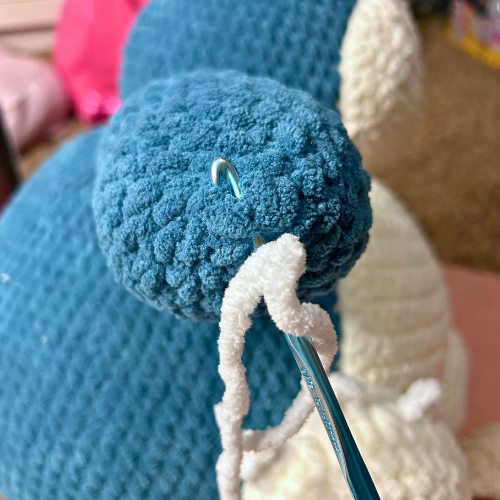
Start with the center nail in the center of the mr. Make a slip knot around your hook (leave a long enough yarn tail to secure later), slst into the mr, ch 3, and then slst back into the mr! Cut your yarn leaving a long enough yarn tail to secure later.
Step 8:
Make the other 4 fingernails!
Repeat step 7 for the other 4 fingernails. Secure all of your ends, and do the same thing for the other hand!
PART THREE: FACE DETAILS

Using any worsted weight black yarn, sew on the face details. The inner part of the eyes start 1 round below the center of the face. The eyes are about 6 stitches in length. To curve the eyes downward, make the outer part of the eyes 1 round below the inner part of the eye.
The mouth is placed 3 rounds below the inner part of the eyes, or 4 rounds from the center of the face. The mouth is about 7 stitches long. I also make 2 layers of my embroidery to add some thickness.
Refer to the photo above for a visual!
After this, you may optionally move onto the felt teeth.

Cut out 4 small triangle pieces using white felt. I like to sew 2 layers of felt together to make sure the teeth are more durable and don’t easily rip or fray when tugged. If you are deciding to make the teeth, I would highly recommend doing this!

Using white embroidery thread and an embroidery needle, sew the two sides of the triangles together. I don’t sew the bottom together yet. You can see I have two long strands of thread at each side. I’ll use these to sew the teeth onto Snorlax’s mouth.

Using the left over strands of thread, sew down the bottom of the teeth along the mouth. I sew them on halfway past where the mouth ends. Secure the ends of your thread and you’re all done!
ʕ•́ᴥ•̀ʔっ♡ CONGRATULATIONS
ʕ•́ᴥ•̀ʔっ♡ you made it!
ʕ•́ᴥ•̀ʔっ♡ CONGRATULATIONS ʕ•́ᴥ•̀ʔっ♡ you made it!
CONGRATS! You just finished crocheting your Snorlax!
I hope you enjoyed crocheting Snorlax with me, and if you have any questions, feel free to email me at crochetbykittengrll@yahoo.com. I am more than happy to help!
I would love to see your finished creations! Feel free to tag me in your posts so I can see (@crochetbykittengrll on TikTok/Insta/YouTube/Pinterest)! Or follow me to keep up with any future patterns!
The best way to support me, and allow me to release more free patterns is to follow me on my socials and if you recreate this design, to tag me!