
Venusaur
Crochet Pattern

IMPORTANT
This pattern is property of @crochetbykittengrll. You may not alter, copy, sell, or redistribute this pattern or any part of it.
If you decide to post any photos of your creations made with this pattern, I would love for you to tag me (@crochetbykittengrll on TikTok/Instagram/Pinterest/YouTube) so I can see and share!
Notes
- This pattern is in US terminology only.
- I use the yarn under/yarn over method, but you may use whichever method you prefer. Keep in mind alternative ways of crocheting may alter the outcome.
- All decreases in this pattern use the invisible decrease method because the regular decrease may leave larger gaps in your work. I highly recommend using the invisible decrease method.
- If you’re having trouble closing your magic ring for ‘Round 1: mr sc 12,’ try the chain 2 method instead!
- The bobble stitches (bo) I use are 4 stitch bobble stitches for the toes, and 3 stitch bobble stitches for the bumps on the skin.
- These instructions are right handed instructions and will likely need modifications if you are left handed.
- This is an advanced crochet pattern and not suitable for beginners.
Materials
Yarn (Regular Venusaur)
Color A: Honey Bunny (Super Bulky 6) in color ‘Turquoise (94)’ - 2 skeins
Color B: Honey Bunny (Super Bulky 6) in color ‘Shamrock’ - 1 skein
Color C: Honey Bunny (Super Bulky 6) in color ‘Candyfloss (45)’ - 1 skein
Color D: Parfait Chunky (Super Bulky 6) in color ‘Almond Butter’ < 1 skein
Color E: Parfait Chunky (Super Bulky 6) in color ‘Teddy Bear’ < 1 skein
Color F: Honey Bunny (Super Bulky 6) in color ‘Pink (47)’ - 1 skein
Color G: Parfait Chunky (Super Bulky 6) in color ‘Mashed Potatoes’ < 1 skein
‘Mashed Potatoes’ is limited edition - you can sub for the color ‘Yellow’ or ‘Sunshine’ instead
Color H: Parfait Chunky (Super Bulky 6) in color ‘White’ < 1 skein
Any worsted weight yarn (Medium 4) in a similar color to ‘Turquoise (94)’ < 1 skein
Any worsted weight yarn (Medium 4) in a similar color to ‘Candyfloss (45)’ < 1 skein
Yarn (✨Shiny✨ Venusaur)
Color A: Parfait Chunky (Super Bulky 6) in color ‘Pistachio’ - 2 skeins
Color B: Honey Bunny (Super Bulky 6) in color ‘Shamrock’ - 1 skein
Color C: Parfait Chunky (Super Bulky 6) in color ‘Summer Squash’ - 1 skein
Color D: Parfait Chunky (Super Bulky 6) in color ‘Mustard’ < 1 skein
Color E: Parfait Chunky (Super Bulky 6) in color ‘Teddy Bear’ < 1 skein
Color F: N/A for this version
Color G: Parfait Chunky (Super Bulky 6) in color ‘Mashed Potatoes’ < 1 skein
‘Mashed Potatoes’ is limited edition - you can sub for the color ‘Yellow’ or ‘Sunshine’ instead
Color H: Parfait Chunky (Super Bulky 6) in color ‘White’ < 1 skein
Any worsted weight yarn (Medium 4) in a similar color to ‘Turquoise (94)’ < 1 skein
Any worsted weight yarn (Medium 4) in a similar color to ‘Summer Squash’ < 1 skein
Felt (Regular Veusaur)
Red Felt
White Felt
(or you can purchase felt eye sewing kits HERE)
Felt (✨Shiny✨ Veusaur)
Yellow Felt
White Felt
(or you can purchase felt eye sewing kits HERE)
Embroidery Thread (Regular Venusaur)
Red Embroidery Thread
White Embroidery Thread
(or you can purchase felt eye sewing kits HERE)
Embroidery Thread (✨Shiny✨ Venusaur)
Yellow Embroidery Thread
White Embroidery Thread
(or you can purchase felt eye sewing kits HERE)
Other
Embroidery Needle
Weaving/Yarn Needle
4mm Crochet Hook
Sewing Pins
Scissors
Stitch Markers
Polyester Stuffing
16 Gauge Craft Wire
Wire Cutters
Beneficial but not necessary: AmiStix, or Upholstery Needles, or Knitting Needles (something to hold 2 pieces together while sewing)
Abbreviations
ch = chain
mr = magic ring
sc = single crochet
sc3inc = single crochet 3 increase
dc = double crochet
tr = triple crochet
inc = single crochet increase
dec = invisible decrease
bo = bobble stitch
CC = change color
rnd = round
slst = slip stitch
st(s) = stitch(es)
FLO = front loop only
BLO = back loop only
FO = fasten off
Legs
Start with Color A and crochet in continuous rounds. Make 4
Round 1: mr 12 (12)
Round 2: (sc, inc) x6 (18)
There are 2 options for rnd 3. You can crochet toenails, or you can keep it simple and not crochet toenails - pick whichever option you prefer! The pro to not crocheting toenails is that you don’t have to worry about the direction the legs are facing when you crochet them into the body, which can get tricky.
If you crochet toenails, you will be changing colors mid-round. To make the color changes easier to read, I’ve color coordinated the text to show which stitches should be made in which color.
The black text indicates the stitches are to be made in Color A.
The Bold Red Text indicates the stitches are to be made in Color H.
Round 3 (with toenails): BLO: [sc 6, bo, sc, bo, sc, bo, sc 7] (18)
Round 3 (without toenails): BLO: [sc around] (18)
Round 4: sc around (18)
Round 5: (sc 5, inc) x3 (21)
Round 6: sc 2, FLO: [bo], sc 13, FLO: [bo], sc 4 (21)
Round 7: sc 7, FLO: [bo], sc 13 (21)
Round 8: sc 13, FLO: [bo], sc 6, FLO: [bo] (21)
Round 9: sc around (21)
FO, leaving a long tail to sew with later. No need to stuff yet. Follow the instructions below based on whether or not you crocheted toenails:
If you didn’t crochet toenails: Set the legs aside and skip to the ‘body’ section.
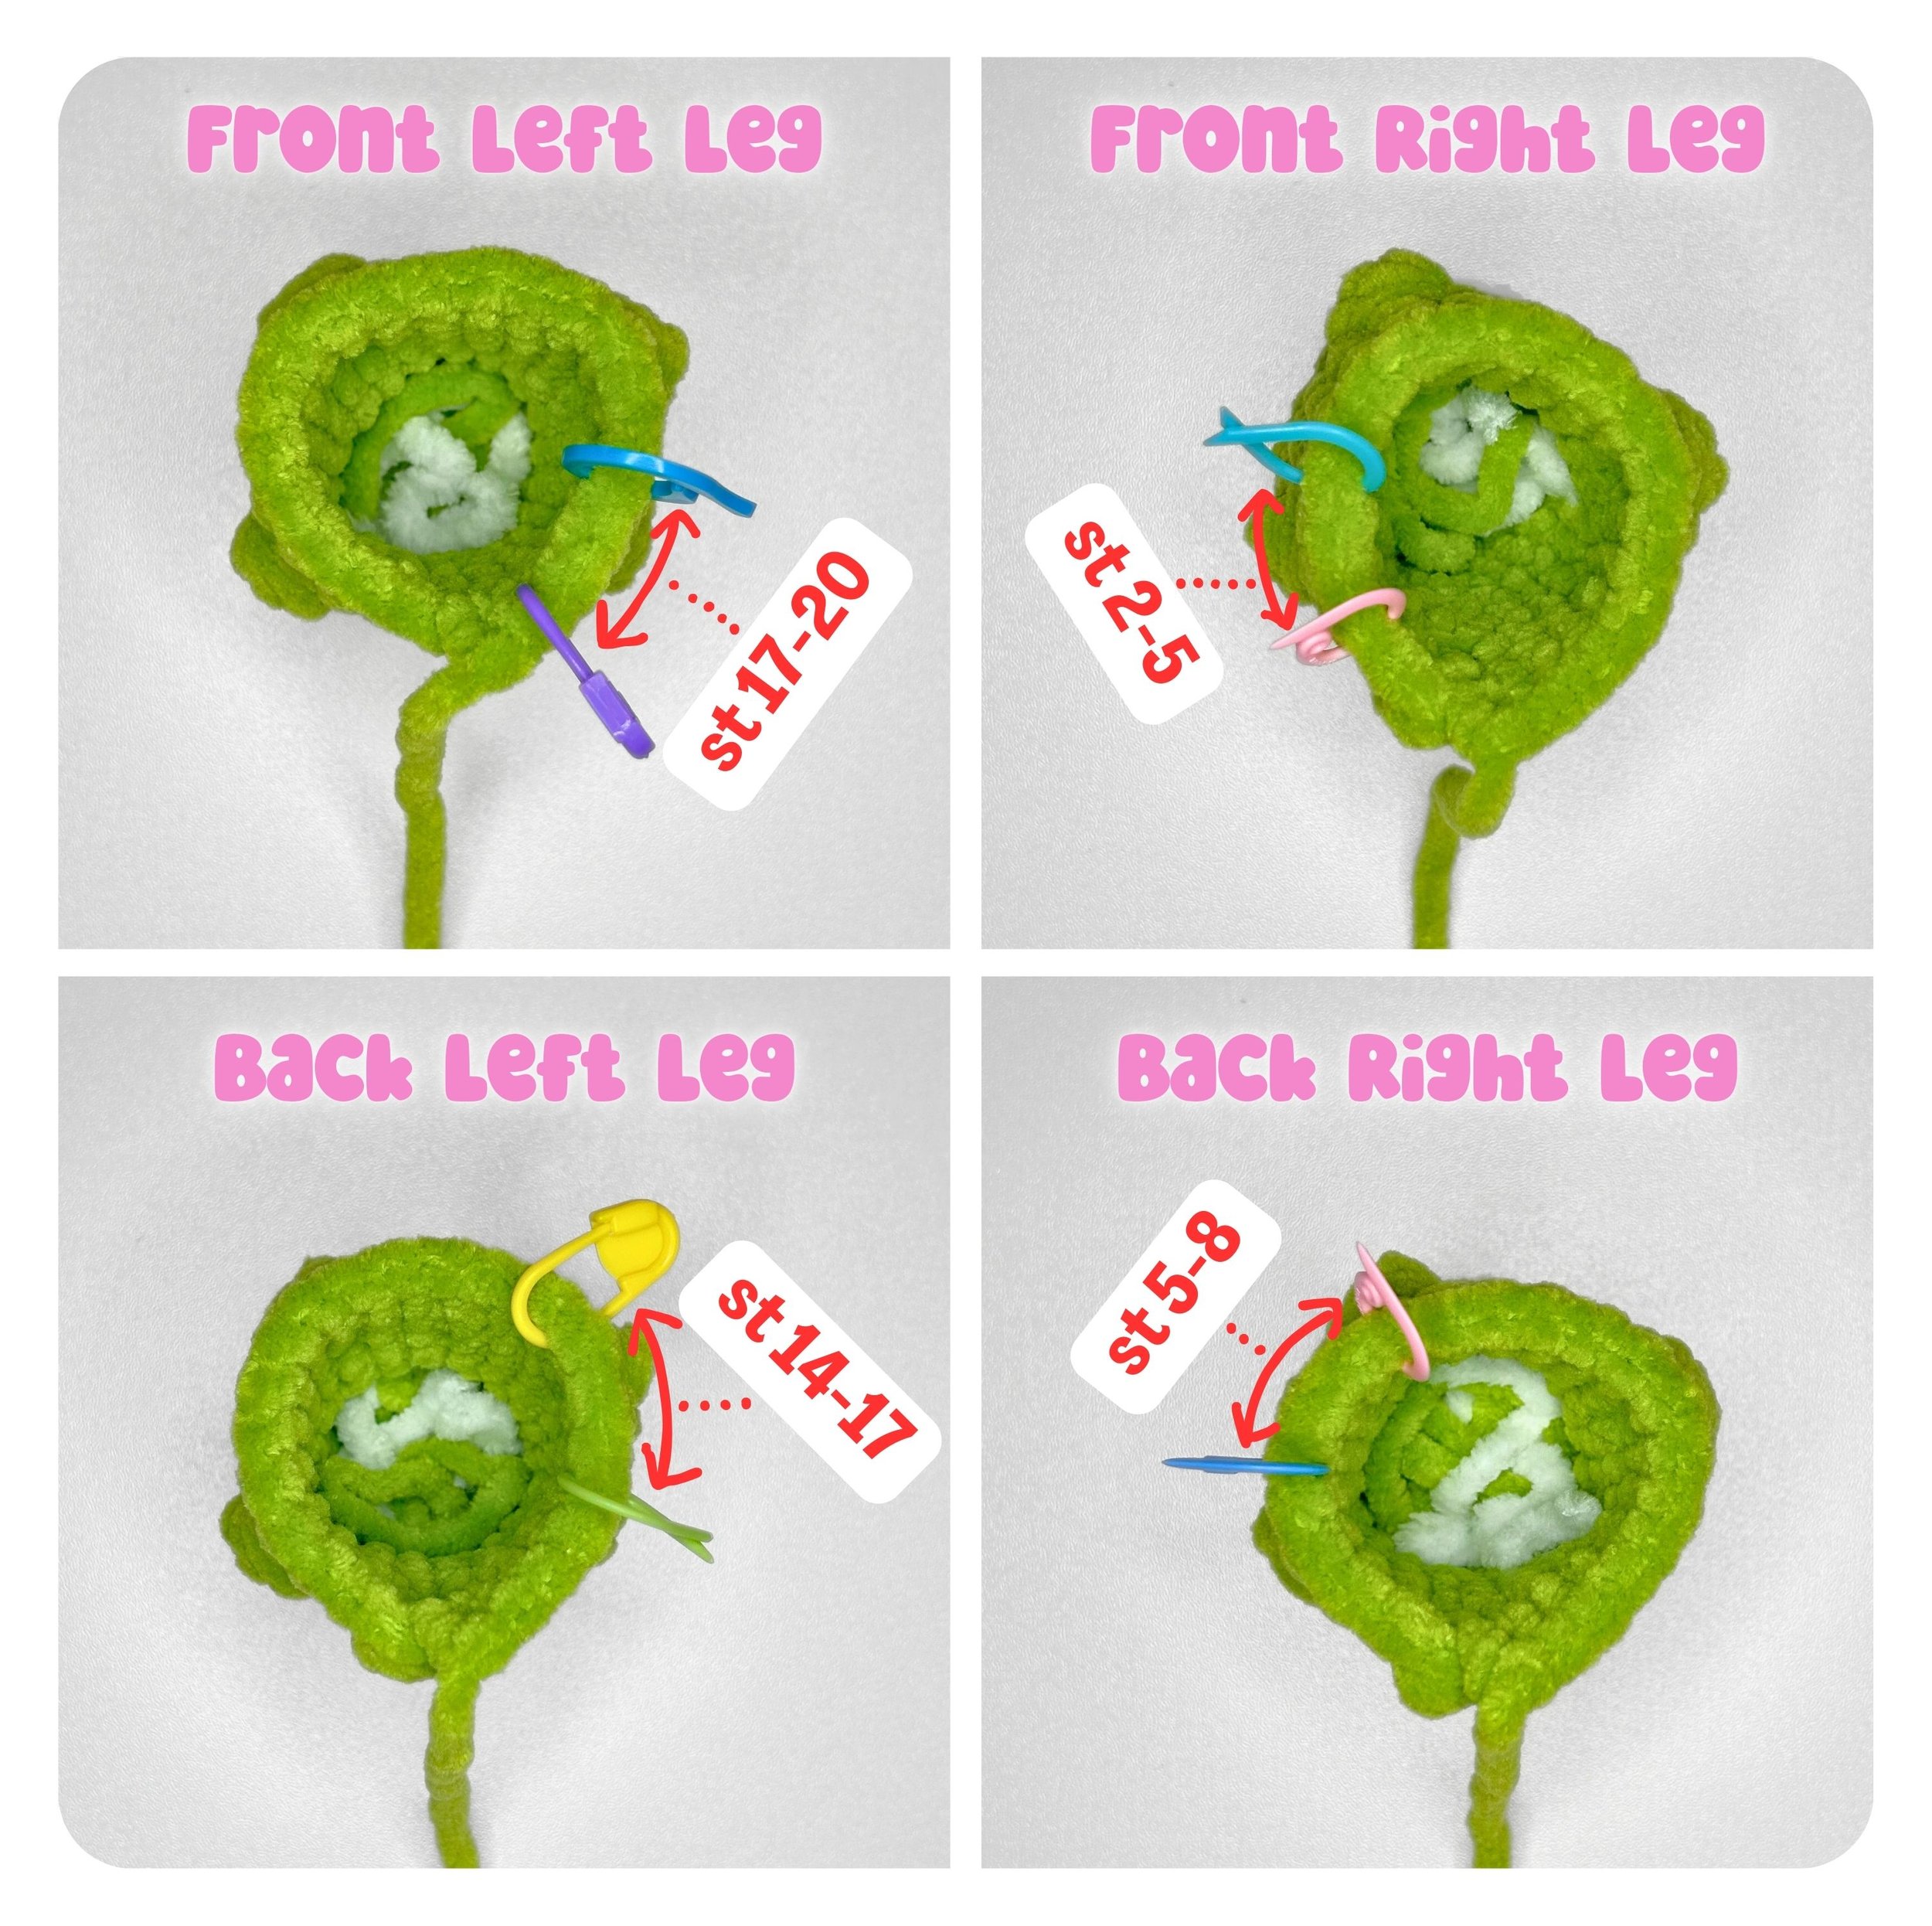
If you did crochet toenails: After you finish all 4 legs, we’re going to use 8 st markers (2 for each leg) to mark certain sts in rnd 9 to differentiate each leg - this will be important later in the body section. *Keep in mind due to tension differences and/or yarn/hook variations, you may need to alter the location of these st markers. But this will be a good place to start.
Front Left Leg: st 17 and st 20
Front Right Leg: st 2 and st 5
Back Left Leg: st 14 and st 17
Back Right Leg: st 5 and st 8
Now you can set these legs aside, but set them aside in a way you’ll remember which leg is which!
Body
Use Color A and crochet in continuous rounds.
Round 1: mr 12 (12)
Round 2: (sc, inc) x6 (18)
Round 3: sc, inc, (sc 2, inc) x5, sc (24)
Round 4: (sc 3, inc) x6 (30)
Round 5: sc 2, inc, (sc 4, inc) x5, sc 2 (36)
Round 6: (sc 5, inc) x6 (42)
Round 7: sc 3, inc, (sc 6, inc) x5, sc 3 (48)
Round 8: (sc 7, inc) x6 (54)
Round 9: sc 4, inc, (sc 8, inc) x5, sc 4 (60)
Round 10: (sc 9, inc) x6 (66)
Round 11: sc 5, inc, (sc 10, inc) x5, sc 5 (72)
In rnd 12, we’ll crochet the 4 legs into the body! Follow the instructions below based on whether or not you crocheted toenails.
OPTION 1:
If you didn’t crochet toenails: You can insert your hook into any st on the legs when you begin to crochet them into the body, but keep in mind we will use the excess yarn tails to sew the gaps shut (so leave them out/don’t crochet over them). Follow rnd 12 below:
*Tip: Legs 1, 2, 3, 4 are all interchangeable.
Round 12(no toenails): sc 7 on the body, sc 17 on leg 1, skip 4 sts on the leg and body, sc 14 on the body, sc 17 on leg 2, skip 4 sts on the leg and body, sc 14 on the body, sc 17 on leg 3, skip 4 sts on the leg and body, sc 14 on the body, sc 17 on leg 4, skip 4 sts on the leg and body, sc 7 on the body (124)
OPTION 2:
If you did crochet toenails: This is where the st markers come in handy! (Reminder: You may need to adjust the location of these st markers due to tension differences and/or yarn/hook variations, but my recommendation will be a good start.)
We’ve already marked the 4 sts in rnd 9 of each leg that we will be skipping in rnd 12 of the body. For example, we marked st 14 and st 17 for the back left leg - this means we will skip st 14, 15, 16, and 17 on rnd 12. This is meant to ensure our toenails are forward facing. Keep in mind we will use the excess yarn tails to sew the gaps shut (so leave them out/don’t crochet over them). Follow rnd 12 below:
Round 12(with toenails): sc 7 on the body, insert hook into st 18 of the back left leg, sc 17 on the back left leg, skip 4 sts on the leg and body, sc 14 on the body, insert hook into st 21 of the front left leg, sc 17 on the front left leg, skip 4 sts on the leg and body, sc 14 on the body, insert hook into st 6 of the front right leg, sc 17 on the front right leg, skip 4 sts on the leg and body, sc 14 on the body, insert hook into st 9 of the back right leg, sc 17 on the back right leg, skip 4 sts on the leg and body, sc 7 on the body (124)

Continue…
Using the leftover yarn tails from the legs, sew the 4 skipped sc’s of the legs to the 4 skipped sc’s of the body. Tie off/secure your yarn tails, and make sure to do this for all 4 legs!
Round 13: (FLO: [bo], sc 15) x3, FLO: [bo], sc 9, (FLO: [bo], sc 15) x2, FLO: [bo], sc 9, FLO: [bo], sc 15, FLO: [bo], sc 7 (124)
Round 14: sc around (124)
Round 15: sc 7, FLO: [bo], sc 15, FLO: [bo], sc 5, FLO: [bo], sc 10, FLO: [bo], sc 24, FLO: [bo], sc 15, (FLO: [bo], sc 13) x2, FLO: [bo], sc 14 (124)
Round 16-17: sc around (124) 2 ROUNDS
Round 18: (sc 29, dec) x4 (120)
Stuff the legs.
Round 19: sc 9, dec, sc 9, FLO: [bo], sc 8, dec, (sc 14, FLO: [bo], sc 3, dec, sc 18, dec) x2, sc 9 (114)
Round 20: (sc 17, dec) x6 (108)
Round 21: (sc 7, dec) x3, sc 4, FLO: [bo], sc 2, dec, (sc 7, dec) x3, sc 6, FLO: [bo], dec, (sc 7, dec) x2, sc, FLO: [bo], sc 5, dec, sc 7, dec (96)
Round 22: sc 2, dec, (sc 4, dec) x15, sc 2 (80)
Round 23: sc 3, dec, (sc 6, dec) x9, sc 3 (70)
Round 24: sc 2, FLO: [bo], sc 2, dec, (sc 5, dec) x9 (60)
Round 25: sc 4, dec, (sc 8, dec) x5, sc 4 (54)
Round 26: (sc 7, dec) x6 (48)
Round 27: sc 3, dec, (sc 6, dec) x5, sc 3 (42)
Start stuffing the body and continue stuffing as you go.
Round 28: (sc 5, dec) x6 (36)
Round 29: sc 2, dec, (sc 4, dec) x5, sc 2 (30)
Round 30: (sc 3, dec) x6 (24)
Round 31: sc, dec, (sc 2, dec) x5, sc (18)
Round 32: (sc, dec) x6 (12)
Round 33: dec 6 (6)
Sew the opening shut and FO, leaving a short tail to weave in. Set aside.
Ears
Start with Color A and crochet in continuous rounds. Make 2.
In this section, we will be color changing mid-round. To make the color changes easier to read, I’ve color coordinated the text to show which stitches should be made in which color.
The black text indicates the stitches are to be made in Color A.
The Bold Red Text indicates the stitches are to be made in Color F for regular Venusaur or Color D for shiny Venusaur.
Round 1: mr 6 (6)
Round 2: sc around (6)
Round 3: inc 3, inc, inc 2 (12)
Round 4: sc 6, sc 3, sc 3 (12)
Round 5: (sc, inc) x3, sc, inc, sc 2, sc in the same st as the last sc to make an inc, sc, inc (18)
Round 6: sc 9, sc 5, sc 4 (18)
Round 7: sc, inc, (sc 2, inc) x2, sc, sc, inc, sc 2, inc, sc 2, inc, sc (24)
Round 8: sc 12, sc 7, sc 5 (24)
Make a slst and FO, leaving a long tail for sewing. Don’t worry about stuffing yet. Set aside.

Head
Use Color A and crochet in continuous rounds.
Round 1: mr 12 (12)
Round 2: (sc, inc) x6 (18)
Round 3: sc, inc, (sc 2, inc) x5, sc (24)
Round 4: (sc 3, inc) x6 (30)
Round 5: sc 2, inc, (sc 4, inc) x5, sc 2 (36)
Round 6: (sc 5, inc) x6 (42)
Round 7: sc 3, inc, (sc 6, inc) x5, sc 3 (48)
Round 8: (sc 7, inc) x6 (54)
Round 9: sc 4, inc, (sc 8, inc) x5, sc 4 (60)
Round 10: (sc 9, inc) x6 (66)
Round 11-13: sc around (66) 3 ROUNDS
Round 14: sc 11, (sc, inc) x6, sc 20, (inc, sc) x6, sc 11 (78)
Round 15: sc around (78)
Round 16: sc 11, (sc 2, inc) x6, sc 20, (inc, sc 2) x6, sc 11 (90)
Round 17: sc 4, dec, (sc 8, dec) x8, sc 4 (81)
Round 18: sc 36, [FLO: inc 9], sc 36 (90)
Using st markers, mark the outside of the first and last inc st for reference later on in rnd 18 (st 37 and st 54 of rnd 18).
Round 19-21: sc around (90) 3 ROUNDS
Round 22: sc 4, dec, (sc 8, dec) x8, sc 4 (81)
Round 23: (sc 7, dec) x9 (72)
Round 24: sc 5, dec, (sc 10, dec) x5, sc 5 (66)
Round 25: (sc 9, dec) x6 (60)
Round 26: sc 2, dec, (sc 4, dec) x9, sc 2 (50)
Round 27: (sc 3, dec) x10 (40)
Start stuffing the head and continue stuffing as you go. *Tip: Stuff the snout area (where the 9 inc sts are) extra well so that it’s not wrinkly.
Round 28: sc, dec, (sc 2, dec) x9, sc (30)
Round 29: (sc, dec) x10 (20)
Round 30: dec 10 (10)
Round 31: dec 5 (5)
Sew the opening shut and FO, leaving a short tail to weave in.
We will now shape the face - NOTE: If you are using a different weight yarn for face shaping other than worsted weight, this face shaping method will not be suitable. To shape the face, you will need a weaving or upholstery needle, and worsted weight yarn in a similar color to Venusaur’s skin color, Color A. Follow the steps below:

Eyelids
*Please Note: Since the eyes are up to you to cut out at your own discretion (unless you’d like to purchase pre-cut felt eyes HERE), these eyelids may not fit your Venusaur and you may need to modify them! They could be too small or too big depending on how small/big you made your eyes. I’d recommend skipping to step 1 of assembly to cut out the eyes before making these eyelids so you can modify accordingly.
To modify the eyelids to your ideal size, simply change the length of your starting chain. For example, if chaining 8 is too small for your eyes, chain 10 or however many sts you need to ensure the eyelids are the same length as your eye. From here, you can modify rows 1 and 2 by making sc’s across row 1, and then making a sc2tog st at the beginning and end of row 2 and 3. You will hopefully have a more ideal eyelid size with these modifications. This may take some trial and error, but this is unfortunately the nature of cutting out your own felt eyes - thankfully the eyelids are very simple and quick to make!
Or completely skip the hassle, and purchase pre-cut felt eye sewing kits HERE!
Use Color A and crochet in rows. Make 2.
Ch 8, and start row 1 in the 2nd ch from hook:
Row 1: sc 7, ch 1, turn (7)
Row 2: sc2tog, sc 3, sc2tog, ch 1, turn (5)
Row 3: sc2tog, sc, sc2tog (3)
Make a slst and FO, leaving a long tail to sew with later. Set aside.

Regular Leaves
Use Color B and crochet into the front and back loops of the foundation ch to make an oval. Then, continue to crochet in continuous rounds, until specified otherwise. Make 3.
*Tip: For rnd 1, I crochet into the front and back loop of each chain. So, crochet into the 15 front loops, turn to the back loops, and crochet into all 15 back loops.
Ch 16, and start rnd 1 in 2nd ch from hook.
Round 1: (in the front loops of the ch: inc, sc 13, inc), turn to crochet into the back loops, (in the back loops of the ch: inc, sc 13, inc) (34)

Round 2: sc, inc, sc 13, (sc, inc) x2, sc 14, inc (38)
Round 3: sc, sc3inc, sc 14, (sc 2, inc) x2, sc 14, sc3inc, sc (44)
In rnd 4, we will temporarily crochet into rows to make the leaf’s margin. You will need to use the following sequence of rows when you see the word ‘MARGIN.’
MARGIN =
Ch 5, and start row 1 in 2nd ch from hook.
Row 1-2: sc 4, ch 1, turn (4) 2 ROWS
Row 3: sc 4 (4)
Round 4: sc 2, sc3inc, sc, (MARGIN, skip 3 sts, slst) x9, sc, sc3inc, sc 2 (48)

Make a slst and FO, leaving a long tail for sewing. You may want to use some scrap yarn to sew the gaps shut between each leaf margin (I don’t do this but it’s up to your personal preference). Weave in your foundation chain’s yarn tail. Set aside.
Big Leaf
*For any visual references, please refer to the “Regular Leaves” section above, as these sections follow the same exact technique!
Use Color B and crochet into the front and back loops of the foundation ch to make an oval. Then, continue to crochet in continuous rounds, until specified otherwise.
*Tip: For rnd 1, I crochet into the front and back loop of each chain. So, crochet into the 25 front loops, turn to the back loops, and crochet into all 25 back loops.
Ch 26, and start rnd 1 in 2nd ch from hook.
Round 1: (in the front loops of the ch: inc, sc 23, inc), turn to crochet into the back loops, (in the back loops of the ch: inc, sc 23, inc) (54)
Round 2: sc, inc, sc 23, (sc, inc) x2, sc 24, inc (58)
Round 3: sc, sc3inc, sc 24, (sc 2, inc) x2, sc 24, sc3inc, sc (64)
In rnd 4, we will temporarily crochet into rows to make the leaf’s margin. You will need to use the following sequence of rows when you see the word ‘MARGIN.’
MARGIN =
Ch 5, and start row 1 in 2nd ch from hook.
Row 1-2: sc 4, ch 1, turn (4) 2 ROWS
Row 3: sc 4 (4)
Round 4: sc 2, sc3inc, sc, (MARGIN, skip 3 sts, slst) x14, sc, sc3inc, sc 2 (68)
Make a slst and FO, leaving a long tail for sewing. You may want to use some scrap yarn to sew the gaps shut between each leaf margin (I don’t do this but it’s up to your personal preference). DO NOT weave in your foundation chain’s yarn tail - we’ll use it for sewing later. Set aside.
Trunk
Start with Color D and crochet in continuous rounds around the foundation ch.
Ch 40, leaving a long starting tail to sew with later, and start rnd 1 in the first ch st, creating a loop.
Round 1: sc 40 (40) CC to Color E.
Round 2: sc around (40) CC to Color D.
Round 3: sc around (40) CC to Color E.
Round 4: sc around (40) CC to Color D.
Round 5: sc around (40) CC to Color E.
Round 6: sc around (40) CC to Color D.
Round 7: sc around (40) CC to Color E.
Round 8: sc around (40) CC to Color D.
Round 9: sc around (40) CC to Color E.
Round 10: sc around (40) CC to Color D.
Round 11: sc around (40)
CC to Color G.
Round 12: BLO: [slst around] (40)
Round 13: BLO: [(sc 8, dec) x4] (36)
Round 14: sc 2, dec, (sc 4, dec) x5, sc 2 (30)
Round 15: (sc 3, dec) x6 (24)
Round 16: sc, dec, (sc 2, dec) x5, sc (18)
Round 17: (sc, dec) x6 (12)
Round 18: dec 6 (6)
Sew the opening shut and FO, leaving a short tail to weave in. Make a slip knot on your hook with Color G, and insert it into the first FLO st of rnd 12 with the opening of the trunk facing away from you *see photo below. Follow the instructions below to create the trunk’s fringe:
Round 1-2: sc around (40) 2 ROUNDS
Round 3: (ch 4, starting in 2nd ch from hook: [hdc, dc, tr], skip 3 sts, slst) x10 (10 spikes)
FO, leaving a long enough tail to secure/weave in. You may want to use some scrap yarn to sew the gaps shut on the trunk’s fringe (I don’t do this but it’s up to your personal preference). Set aside.

Back Petals
Use Color C and crochet in rows. Make 6.
Ch 6, and start row 1 in the 2nd ch from hook:
Row 1-2: sc 5, ch 1, turn (5) 2 ROWS
Row 3: inc, sc 4, ch 1, turn (6)
Row 4: inc, sc 5, ch 1, turn (7)
Row 5-6: sc 7, ch 1, turn (7) 2 ROWS
Row 7: inc, sc 6, ch 1, turn (8)
Row 8: inc, sc 7, ch 1, turn (9)
Row 9-10: sc 9, ch 1, turn (9) 2 ROWS
Row 11: inc, sc 8, ch 1, turn (10)
Row 12: inc, sc 9, ch 1, turn (11)
Row 13-15: sc 11, ch 1, turn (11) 3 ROWS
Row 16: sc 11
FO, leaving a short tail to tuck in later. Set aside for now.
Front Petals
For these pieces, we will be color changing mid-row A LOT. To make all the color changes easier to read, I’ve color coordinated the text to show which stitches should be made in which color.
The black text indicates the stitches are to be made in Color C.
The Bold Red Text indicates the stitches are to be made in Color H.
*Tip 1: Don’t carry your color changes, cut them as you go and drop them all to the backside of the petal OR weave them to the backside at the end. The backside with all of the loose ends will not be seen. You’ll know which side is the frontside because the starting yarn tail will be on the right when the frontside is facing you (if you’re right handed like me).

Start with Color C and crochet in rows. Each petal will have a different design, so make one of each of the 6 petals below.
Petal 1:
Ch 6, and start row 1 in the 2nd ch from hook:
Row 1: sc 5, ch 1, turn (5)
Row 2: sc 3, sc 2, ch 1, turn (5)
Row 3: inc, sc 2, sc 2, ch 1, turn (6)
Row 4: inc, sc, sc 3, sc, ch 1, turn (7)
Row 5-6: sc 7, ch 1, turn (7) 2 ROWS
Row 7: inc, sc 6, ch 1, turn (8)
Row 8: inc, sc 7, ch 1, turn (9)
Row 9: sc 5, sc 2, sc 2, ch 1, turn (9)
Row 10: sc 2, sc 2, sc 5, ch 1, turn (9)
Row 11: inc, sc 8, ch 1, turn (10)
Row 12: inc, sc 9, ch 1, turn (11)
Row 13: sc 2, sc 4, sc 5, ch 1, turn (11)
Row 14: sc 5, sc 5, sc, ch 1, turn (11)
Row 15: sc, sc 5, sc 5, ch 1, turn (11)
Row 16: sc 5, sc 4, sc 2 (11)
DO NOT FO. Cut about 15 inches of wire and use wire cutters to bend the ends inwards so that there are no pointy ends that will hurt you as you proceed with the following instructions.
Weave in any/all yarn tails to the backside of the petal if necessary (this will be the hidden side). Now grab one of your back petals and sandwich that together with your front petal - place the wire in-between the petals

Use your working yarn to crochet both pieces together: To do this, make sc’s around the entire piece, making sure to crochet over the wire as you go. You will also want to stuff in any loose ends along the way. When you make it to any of the 4 corner sts, make an inc st, instead of a sc st. You can leave the 2 ends of the wire hanging out of the bottom 2 corners of the petal.
When you’ve finished crocheting around the petals, you DO NOT need to stuff - make a slst and FO, leaving a short tail to weave in. Secure and weave it into the inside of the petal. Set the petal aside for now.

Petal 2:
Ch 6, and start row 1 in the 2nd ch from hook:
Row 1-2: sc 5, ch 1, turn (5) 2 ROWS
Row 3: inc, sc 4, ch 1, turn (6)
Row 4: inc, sc 3, sc 2, ch 1, turn (7)
Row 5: sc 2, sc 3, sc 2, ch 1, turn (7)
Row 6: sc 7, ch 1, turn (7)
Row 7: inc, sc 6, ch 1, turn (8)
Row 8: inc, sc 7, ch 1, turn (9)
Row 9: sc 2, sc 2, sc 5, ch 1, turn (9)
Row 10: sc 5, sc 2, sc 2, ch 1, turn (9)
Row 11: inc, sc 8, ch 1, turn (10)
Row 12: inc, sc, sc 3, sc 5 ch 1, turn (11)
Row 13: sc 5, sc 4, sc 2, ch 1, turn (11)
Row 14: sc 2, sc 4, sc 5, ch 1, turn (11)
Row 15: sc 5, sc 3, sc 3, ch 1, turn (11)
Row 16: sc 11 (11)
DO NOT FO. Follow the same instructions under front petal 1.

Petal 3:
Ch 6, and start row 1 in the 2nd ch from hook:
Row 1-2: sc 5, ch 1, turn (5) 2 ROWS
Row 3: inc, sc 2, sc 2 ch 1, turn (6)
Row 4: inc, sc 3, sc 2, ch 1, turn (7)
Row 5-6: sc 7, ch 1, turn (7) 2 ROWS
Row 7: inc, sc 6, ch 1, turn (8)
Row 8: inc, sc 3, sc 4 ch 1, turn (9)
Row 9: sc 3, sc 3, sc 3, ch 1, turn (9)
Row 10: sc 2, sc 4, sc 3, ch 1, turn (9)
Row 11: inc, sc 8, ch 1, turn (10)
Row 12: inc, sc 9, ch 1, turn (11)
Row 13: sc 11, ch 1, turn (11)
Row 14: sc, sc 3, sc 7, ch 1, turn (11)
Row 15: sc 6, sc 5, ch 1, turn (11)
Row 16: sc 5, sc 6 (11)
DO NOT FO. Follow the same instructions under front petal 1.

Petal 4:
Ch 6, and start row 1 in the 2nd ch from hook:
Row 1-2: sc 5, ch 1, turn (5) 2 ROWS
Row 3: inc, sc 4 ch 1, turn (6)
Row 4: inc, sc 3, sc 2, ch 1, turn (7)
Row 5: sc 2, sc 3, sc 2, ch 1, turn (7)
Row 6: sc 2, sc 2, sc 3, ch 1, turn (7)
Row 7: inc, sc 6, ch 1, turn (8)
Row 8: inc, sc 7 ch 1, turn (9)
Row 9: sc 2, sc 2, sc 5, ch 1, turn (9)
Row 10: sc 4, sc 3, sc 2, ch 1, turn (9)
Row 11: inc, sc 4, sc 4, ch 1, turn (10)
Row 12: inc, sc 3, sc 3, sc 3 ch 1, turn (11)
Row 13: sc 11, ch 1, turn (11)
Row 14: sc 2, sc 2, sc 7, ch 1, turn (11)
Row 15: sc 6, sc 3, sc 2, ch 1, turn (11)
Row 16: sc 2, sc 3, sc 6 (11)
DO NOT FO. Follow the same instructions under front petal 1.

Petal 5:
Ch 6, and start row 1 in the 2nd ch from hook:
Row 1: sc 5, ch 1, turn (5)
Row 2: sc 2, sc 3, ch 1, turn (5)
Row 3: inc, sc 2, sc 2, ch 1, turn (6)
Row 4: inc, sc 5, ch 1, turn (7)
Row 5: sc 7, ch 1, turn (7)
Row 6: sc 5, sc 2, ch 1, turn (7)
Row 7: inc, sc 2, sc 4, ch 1, turn (8)
Row 8: inc, sc 3, sc 4, ch 1, turn (9)
Row 9: sc 3, sc 6, ch 1, turn (9)
Row 10: sc 9, ch 1, turn (9)
Row 11: inc, sc 8, ch 1, turn (10)
Row 12: inc, sc 3, sc 6, ch 1, turn (11)
Row 13: sc 5, sc 4, sc 2 ch 1, turn (11)
Row 14: sc, sc 5, sc 5, ch 1, turn (11)
Row 15: sc 11, ch 1, turn (11)
Row 16: sc 11 (11)
DO NOT FO. Follow the same instructions under front petal 1.

Petal 6:
Ch 6, and start row 1 in the 2nd ch from hook:
Row 1-2: sc 5, ch 1, turn (5) 2 ROWS
Row 3: inc, sc 3, sc, ch 1, turn (6)
Row 4: inc, sc 3, sc 2, ch 1, turn (7)
Row 5: sc, sc 4, sc 2 ch 1, turn (7)
Row 6: sc 7, ch 1, turn (7)
Row 7: inc, sc 6, ch 1, turn (8)
Row 8: inc, sc 7, ch 1, turn (9)
Row 9: sc 9, ch 1, turn (9)
Row 10: sc, sc 2, sc 6 ch 1, turn (9)
Row 11: inc, sc 4, sc 3, sc, ch 1, turn (10)
Row 12: inc, sc 9, ch 1, turn (11)
Row 13-14: sc 11, ch 1, turn (11) 2 ROWS
Row 15: sc 2, sc 2, sc 7, ch 1, turn (11)
Row 16: sc 6, sc 3, sc 2 (11)
DO NOT FO. Follow the same instructions under front petal 1.

Assembly
1. Cut out and embroider your felt eyes. For regular Venusaur, you will want to use red and white felt. For shiny Venusaur, you will want to use yellow and white felt. Using matching embroidery thread and an embroidery needle, sew the eyes together, and then onto the face! Make sure they’re evenly spaced away from the face shaping.
(or you can purchase felt eye sewing kits HERE)


2. Sew the eyelids over top of the felt eyes. Make sure the starting ch is the side that lays across the eyes (this side won’t be sewn down). You can choose whether you want the eyelids pointed up for an angry look, or pointed down for a sleepy look.
Use the leftover yarn tails from the eyelids to sew only the round portion of the eyelids around the circular eyes. Tie off/secure your yarn tails.

3. Sew the ears onto the head using their leftover yarn tails. I sew mine over top of rnds 7-15, about 5 sts away from the eyelids.
*Tip: Sew only the BLO sts of Color F (for regular) or Color D (for shiny) of the ears, leaving the front loops out. This makes the sewing look cleaner for that part.
You can reference the photos below to see the angle I sew them onto the head. The 24 sewing pins outlines where I’ll be sewing the 24 sts of the ear.
Before you finish sewing the ears on, make sure to lightly stuff them. And once you finish, tie off and secure your yarn tails - tuck them into the head.

4. Bend the excess wire from the petals at a 90 degree angle and start inserting the wire of the petals in-between rnds 11-12. Make sure to evenly space them throughout the 40 sts between rnds 11-12.
Once the wire is inserted, you can bend the wire some more to be flush with the inside of the trunk if you need to. You just want to make sure the wire is safely tucked into the trunk, and that there’s room in the center to stuff it properly. If your wire is a little bit too long (longer than the trunk), you can also trim it at this point.
After all the petals are inserted, you can use your worsted weight yarn, in a similar color to Color C, to start sewing the petals in-between rnds 11-12.
Once all the petals are sewn on, tie your yarn tails together on the inside of the trunk. You can now stuff the trunk!

5. Using your worsted weight yarn in a similar color to Color A, sew the head onto the body. If you crocheted toenails, keep in mind you’ll want the toenails to be forward facing.
*TIp: If you don’t have anything like AmiStix to hold these pieces together, you can use upholstery needles or knitting needles to hold together the pieces! Using something like this will be greatly beneficial for this process.
When you sew the head and body together, you should ideally be hiding the face shaping yarn tails between the body and head.
One you’ve finished sewing, you can tie off/secure your yarn tails and tuck them into the head or body.
6. Sew the trunk onto the center-back of the body using its leftover yarn tail. Make sure none of the 6 petals land directly above his head.
Before you completely sew the trunk onto the body, make sure to stuff it some more. And once you finish sewing, tie off/secure your yarn tails, and tuck them into the body.
You can now bend the tips of the petals a little bit downwards so they aren’t just sticking straight out!

7. Sew the bottom ~8 sts of the leaves at the edge of the trunk, where the body and trunk are connected. Make sure that the big leaf lays overtop of Venusaur’s head. You will want to use the yarn tail that was left out (on the backside of the big leaf from the foundatoin ch) to sew the leaf to the top of the head. We’ll want to ensure this leaf particularly is secured to the top of the head.

* CONGRATS *
You're Finished!
* CONGRATS * You're Finished!
I hope you enjoyed crocheting Venusaur with me! If you have any questions, feel free to email me at crochetbykittengrll@yahoo.com. I am more than happy to help!
I would love to see your finished creations! Feel free to tag me in your posts so I can see (@crochetbykittengrll on TikTok/Insta/YouTube/Pinterest/Facebook)! Or follow me to keep up with any future patterns!
The best way to support me, and allow me to release more free patterns is to follow me on my socials and if you recreate this design, to tag me!


